F150 Ecoboost Forum banner
Status
Not open for further replies.

2012 Ecoboost Engine Removal / Replacement - From engine failure

60K views 67 replies 21 participants last post by  ccharron24  
#1 · (Edited)
I have a 2012 F150 Ecoboost 3.5 with a blown engine at just 78K miles. Failure was during acceleration to merge into traffic. Engine just blew up and now have hole on the side of the block.

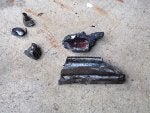
I have a strong suspicion it was some sort of Hydrolock. I found oil on the intercooler, not a lot left there now. did it gobble up a good amount? did something else happened? Weak rod over time?

I am a home DIY and learning a lot thru this process on my first truck work on my own. So far it has been quite the trip finding how how all this is assembled and works.

WARNING, THIS IS NOT A STEP BY STEP DIY. JUST A GENERAL GUIDE.
SOME OBSERVATION AND COMMON SENSE IS REQUIRED ON YOUR OWN!!

Removing the head lights should be the first step.
Removing the bumper is definitely should be your second step in the process.
-Disconnect fog lights
-undo all the fender side bolts and nuts and any plastic clips
-undo the cable for the hood latch

The bumper will come off as one whole unit. No need to remove all the pieces of the bumper. There are two plastic tabs on top near radiator you need to push from underneath in order to release the bumper from the truck.

After that drain coolant and begin removing all radiator components, cabling harness clips pull from their respective points, remove the hood latch, undo the top bar, power box bolts, etc.
I left the oil cooler transmission lines connected and just placed the radiator on the side. Hoping I can do this that way to avoid fluid mess and loss.
The AC lines will need to be disconnected. observe local laws on purging your AC gas.

Removing the intercooler:
Undo all clamps. Remove lower support bar and drop the intercooler thru the bottom.

Disconnect and remove all Coolant hoses and remove the air filter box and coolant container as a whole unit. Just two bolts.

Remove lower pans and skid plate.

Now the fun Part starts... I cant figure out how the transmission bolts are to be removed... How is this supposed to be done? Tips and info will be greatly appreciated.
Thanks

Pictures of progress thus far:


OK>
Firgured after the pointers here that lifting the CAB was the only way to get to those bolts.
Removed front CAB bolts, and two middle ones. Left the rear attached.
detached any harness cables in the front that may be too tight.
disconnected steering shaft
detached braking from booster and cables.
Disconnected 4x4 sharft to allow my hands to fit, find and wrench the bolts out by feel.
F
 
Save
#2 ·
While I have no real knowledge to add on your issue, as a noobie myself, I can appreciate a "walkthrough" like this. Really helps people out if they're new. I do wish you luck on getting your issue resolved!
 
Save
#3 · (Edited)
I assume you are talking about the bolts holding the transmission to the engine? Typically the engine and transmission are assembled together then put into the chassis. To accomplish this correctly, I would first disconnect all of the tubing that you can reach from the front. I know moving it to the side will save time, however for a job this big, those items moved to the side are going to get in the way. My understanding of the process is something like this:

(First chock the tires, set the parking brake, remove the battery and the hood. You may want to have the truck on a level surface, it's much easier this way.)
1) Disconnect the drive shaft at the rear end and lower it.
2) Remove the drive shaft from the transfer case. (Catch the oil)
3) Remove the crossmember and transmission mounts. (Support the rear of the tranny with a jack or block)
4) Disconnect any electrical connections to the trans, o2 sensors, etc.
5) Unbolt the exhaust ahead of the cats.
6) Make sure everything connecting the motor is disconnected.
7) Attach a cherry picker to the block and start cranking just enough to take up some of the engine weight.
8) Remove the motor mount bolts.
9) Angle the motor out with the tranny attached. (Shove a rag or something in the rear of tranny, it will leak fluid. Alternatively, drain the transmission.)

Those are just the basics of what I know. The key is to take your time and make sure everything is disconnected as you pull the motor. The only thing I am not sure about is if you can remove the transfer case while it's in the vehicle. I have never pulled a motor from a 4x4 before, but I have done plenty of other cars.

Another approach if there is room, which there probably is, is to pull the motor forward to get at the tranny bolts and remove it while it's in the truck. This requires supporting the front of the transmission in some manner and may not be worth the time savings.

A lot of people swapping motors on this truck remove the cab because a lot of the motor, turbos etc. are way back under the firewall. You'll want to pay particular attention to the turbos because there are a lot of connections that are easier accomplished while the engine is out of the truck, such as the turbo coolant lines.

Good luck! It's not impossible, but get yourself a good shop manual and take your time.
 
  • Like
Reactions: devin
Save
#5 ·
Thanks for the info! I was provided access to the Chilton manual... but the funny thing is that all they say is... "Remove the 4 upper bellhousing-to-engine bolts." lol...
I have a feeling I need to loosen the transmission support to allow access to those 4 bolts. My initial observation tells me I cant even use swivels because the curving and tightness to the cab floor. Definitely need to observe more and see. I won't be able to touch this likely till next Saturday.
 
Save
#7 ·
Pretty sure you're going to have to move the engine forward to get at those bolts. You'll definitely need to in order to torque them. Again, I would suggest a FORD service manual for a job this big. Get one off ebay.
 
Save
#8 ·
All me to arm-chair quarterback for a second - move that bumper to the grass! It hurts me to see painted parts sitting on concrete with point loads on the corners like that... kiss that paint goodbye.

Good luck with the swap! My last engine swap was a 5.0 Mustang. Much simpler than this...
 
  • Like
Reactions: BRoell
Save
#10 ·
thanks guys! it is a beautiful color and expensive paperweight! im so upset with the situation than i have lost care for the truck looks. its a nice FX4 with all the options. just no appearance package. i added raptor wheels and really sets it appart. bumper is safe now. lol


I know that blue is such a beautiful color, I was cringing looking at the photos, but trying to help nonetheless.
 
Save
#9 ·
I know that blue is such a beautiful color, I was cringing looking at the photos, but trying to help nonetheless.
 
Save
#11 ·
Success, lifted cab just enough to get down there and the top transmission bolts are out. updated the Post with pics. thanks for the CAB lift tips. Looked up a video online and definitely much easier.
 
Save
#12 ·
Weekend #3
engine is out after battling removal due to one of the driver side mount bolts getting pinned and exhaust nuts being stubborn. this engine reminds me or Airplane turbine engines with all the lines all over the engine. This thing feel its more complicated than it needs to be... guaranteed service for dealers long term. lol


#13 ·
View attachment 145465

[/QUOTE]

YES!!! I love seeing guys just getting in there and fixing Ford's sloppy azz shiet! Awesome! Keep at it man!
 
Save
#15 ·
Definitely. too many of us, but people keep saying its normal. That is just BS... Its all poor design and likely poor manufacturing as well on top of all the other causes. Something is consistently causing these for so many years to so many people. And we only get to see those who post... there are a ton of poor souls out there not on the public forums that you know are going thru this...


Looks like mine did (holes in Block), going to bet your front two Pistons are broken too....

Keep moving for ward and let us know what you find inside.
 
Save
#16 ·
Has anyone done a list of all the parts that should be updated on these Ecoboost 3.5L.

Seems like the chain, tensioner, water pump. Any updated seals or anything I should do before putting this engine back in. The replacement engine has 100K already on it. Many thanks.
 
Save
#17 · (Edited)
Was the motor in the yard when you bought it? Or was it freshly pulled? If it was opened up or was in a really dusty enironment you might have a lot of dirt inside the motor. Obviously a complete tear down and rebuild would be best, but I would pull the oil pan to at least see what's sitting inside it. You can then inspect the crank and bearings, main seals, etc. At a minimum I would try to do a compression check or see if the place you get the motor from offers some guarantee in this area.

In regard to changing parts, I'd definitely do the phasers and VCT solenoids after you confirmed that the engine isn't full of gunk. Not sure if there's a way to prime the oil pump like classic cars, but if you could flow fresh oil over the cams inside the motor it might help flush any junk that is in there or reveal a blocked passage. You want to make sure that the motor is clean on the inside before you button it back up, otherwise that stuff can plug the many passages and VCT solenoids once you run it. I had no idea how precise anad complicated these motors were until I opened mine up and got my hands dirty. There's a lot of small passages that flow oil to various parts of hte motor.
 
Save
#18 ·
good info. thanks. I have to open it up for swapping the valve cover as they got cracked during shipping.

Not a bad idea to open the bottom and do an inspection and do the compression check.
The motor seems freshly pulled and was clean. they even put caps on every hole.

The one thing I did notice was oil on the driver side turbo but was just a little. Not sure if it was from the "Normal ford oil seepage on these" or the engine was turned to the side for some reason. Turbos do spin freely and are clean. No sign of abuse or extreme heat etc. but will definitely open up that oil pan and inspect.
 
  • Like
Reactions: Mikedick77
Save
#19 ·
Late to the party but good work so far. I removed the intake manifold and hard plastic coolant lines underneath the manifold. With the manifold moved there was just enough space to squeeze an arm in between the firewall with a deep socket then a speed wrench, but it did filet my forearms a bit. I'm puling my motor out of the vehicle today, everything's disconnected and just waiting to pick. I chose to leave the front driveshaft, trans mount, and a few other things, we'll see how it works out.
 
Save
#21 ·
Ouch. Definitely felt easier lifting the cab. Watch that mount bolt on driver side. Disconnect the steering shaft too. Good luck!
 
Save
#20 ·
I would definitely check out compression and clean up sensors and misc while its on the stand. Not sure if you've priced timing components, but I think if you replace all the associated parts + the junk yard motor it might come out close to a new long block cost. In your case you're also getting replacement turbos, but with more miles than your current ones. None of the engine replacement options are very wallet friendly from what I've put together.
 
Save
#22 ·
Had some little extra time tonight and started dissembling the damaged engine. I feel now, based on what I see as I open things, that this was caused by oil collected in the Intercooler getting sucked in and causing the hydro lock when I suddenly accelerated fast Into Highway. Will post pics later. The varnish on the valves is insane as well.

There was oil in the intercooler and pipes. Thought nothing of it being the oil till I started seeing more now.
 
Save
#24 ·
I feel now, based on what I see as I open things, that this was caused by oil collected in the Intercooler getting sucked in and causing the hydro lock when I suddenly accelerated fast Into Highway

There was oil in the intercooler and pipes. Thought nothing of it being the oil till I started seeing more now.
What makes you think that, the presence of the oil? Have you seen any damage that would support that?


Will post pics later. The varnish on the valves is insane as well.
Curious to compare to mine, just took photos a few days ago and posted in my build thread.
 
Save
#23 ·
If you wouldn’t mind, show us the backs of the valves when you post the pics.
 
Save
#26 ·
Pics. Just noticed the paper clip icon. Lol

Look at all that oil! Just dripping off the manifold seals. The intercooler Has oil inside as well. No signs of water mixed with oil.
Pipes have oil as well In the various spots it can rest. Like the couplers.
 

Attachments

  • Like
Reactions: devin
Save
#28 ·
Holy crap that's a ton of oil in the intake and in the heads by the valves!!! Like whoa! :eek: Not good! I just had my intake off not that long ago, and it was drier than a popcorn fart! As for the valve cleaning, Google "Walnut blast Ecoboost valves" and you'll get a ton more to read.
 
Save
#29 ·
Mine looked similarly, just not as wet. How many miles on that intake? Mine had about 68,000 miles on it. But it was thick enough to scratch the film with your nail. After seeing mine, I'll probably do a walnut blast every 40-50k miles.
 
Save
#30 ·
Mileage is 78K

I ended up cleaning with throttle body air intake cleaner. let it soak with valves closed for a couple minutes then soaked rags and repated a few times to remove. used pressurised air to dry the rest up and loosen up any hard to reach spots. not perfect clean but its clean.

Truck is running as of this saturday. It gave me a scare as I did not realize how much oil had been collected on the exhaust from the original engine damage.

I had a huge smoke cloud took about two hours to slowly disipate drove a few times at varying rpms and now its very low...

I am hoping it all goes a way when i start driving it this week.

Next on the list is making my own catch can and filtration to have only clean air enter the intake system and tubing. The amount of oil everywhere was insane.
 
Save
#32 ·
Wait a minute, how did you go from pulling the motor and looking at the oily intake to driving around town? Have any more photos of the motor installation? What parts did you move over? We need more details!
 
Save
#34 ·
Once engine was out, the reinstall is easy. This last Saturday/Sunday was swap a few parts, and install. The install is much faster. the hardest part was aligning the engine and transmission converter.

Since I was on the move getting things done, I really did not bother with pics, since its all the reverse of removal.

I had to swap the engine harness, driver valve cover, water pump and some related plastic broken parts that came with used engine, swap intake manifold due to broken plastic parts, I reused everything else from the used motor. Turbos looked to be in great shape and associated engine parts.

Let me know any details you want me to speak about.
 
  • Like
Reactions: snakebitten
Save
#35 ·
My catch can setup. Built my self. Need to get pvc or oil/fuel rated hoses. Vent pipes already had oil and you know where it’s all going...

One hose to each valve cover, one hose to oem location on driver side turbo. Capped intake manifold as I don’t want any vapor going into intake valves. Might do something where a separator is used to ensure only dry air goes in the manifold.
 

Attachments

Save
#36 ·
Nice build there. How's that new setup running for you after some daily driving?
 
Save
#37 ·
So far great mike. Finished last night. Idles and runs perfectly. Now to see how much it collects.
The can is screened, baffled and filled with stainless steel sponges. The bottom has a drain and also Has full removable bottom cap for inspection and cleaning. Let’s see after a some miles are in it.
 
  • Like
Reactions: Mikedick77
Save
#38 ·
That's awesome it worked out for you in the end. Alot of work you put into the truck, and glad it runs great for you. I hope you get to enjoy it problem free for a good long time!
 
Save
#41 · (Edited)
No. I built a cap and sealed it. I don’t want vapors going into intake. Will do once I figure how to get a filtered air only for that hose.

The catch can is huge too. To allow time to get as much vapor filtered as possible.

It’s already trapping oil and that brown liquid in just like 50 miles.
 
Save
Status
Not open for further replies.
You have insufficient privileges to reply here.