
Piecing together parts with the help of RBrown and Knif87.
I am thinking of using -12AN fittings and lines so there is no restriction/excess pressure in oil system. Thoughts?
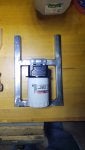
So far this is the best piece I have found for the filter housing:
Universal Billet Remote Filter Oil Take-Off Plate ENV-16X
It says 2.609 inch ID O-ring, Cantons piece is 2.625 (does not say if ID or OD)...So i am assuming it would work?
Next is the remote mount: Setrab looks like a nice piece, comes with no fittings (sold seperate). Peterson looks really nice and comes with fittings.
http://www.setrabusa.com/products/oilcontrol/oilfilteradapters/remote/index.html
http://www.petersonfluidsys.com/filter_mount.html
Finally hoses: Aeroquip socketless hose, will this hold enough PSI for oil pressure I.E. not blow off? I like this idea because it is simpler to assembler than other hose units. Says hose it compatible with fuel and oil. It looks like the same stuff FullRace uses on their catch can system actually.
Catalog
Catalog
I am thinking of using -12AN fittings and lines so there is no restriction/excess pressure in oil system. Thoughts?
So far this is the best piece I have found for the filter housing:
Universal Billet Remote Filter Oil Take-Off Plate ENV-16X
It says 2.609 inch ID O-ring, Cantons piece is 2.625 (does not say if ID or OD)...So i am assuming it would work?
Next is the remote mount: Setrab looks like a nice piece, comes with no fittings (sold seperate). Peterson looks really nice and comes with fittings.
http://www.setrabusa.com/products/oilcontrol/oilfilteradapters/remote/index.html
http://www.petersonfluidsys.com/filter_mount.html
Finally hoses: Aeroquip socketless hose, will this hold enough PSI for oil pressure I.E. not blow off? I like this idea because it is simpler to assembler than other hose units. Says hose it compatible with fuel and oil. It looks like the same stuff FullRace uses on their catch can system actually.
Catalog
Catalog
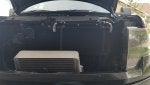
") .) Still need to paint and mount it. So far I am planning to keep the stock cooling setup, we'll see how that goes.
.) Still need to paint and mount it. So far I am planning to keep the stock cooling setup, we'll see how that goes.